/   /   /  OroCommerce for developers: Manage attributes groups in frontend

Note:

For more extensions and themes visit our store

OroCommerce for developers: Manage attributes groups in frontend


OroCommerce give ability to organize your product attributes by group for example media group , price group … and every product family constructed from many attributes group  .

So when the customer visits the product view page in the frontend they explore all infos related to current product – attributes value – Divided in many container each one contain many groups .

product-view-template


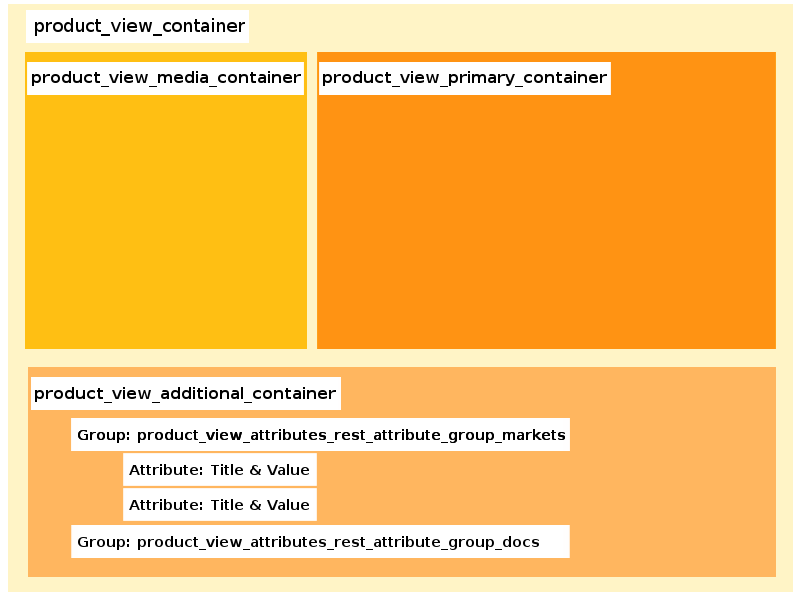
For example let’s talking about product_view_additional_container which contain additional attributes .

  • System attributes like : media – prices …
  • Additional Attribute : attributes which you have added to show more specification about your products for example .

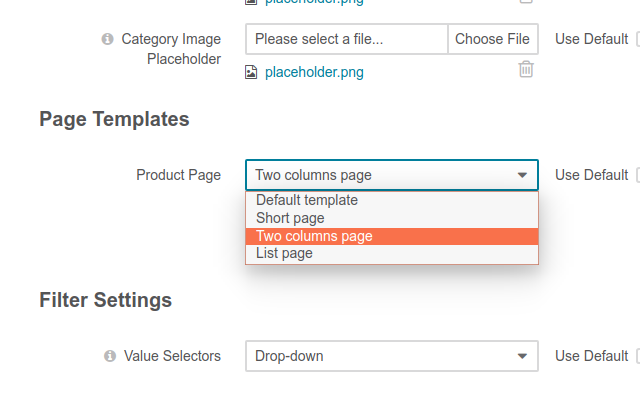
Inside product_view_additional_container OroCommerce push all groups with additional attributes – that in case when you using default product view template or two columns page - 
product-view-template  

For example product_view_attributes_rest_attribute_group_markets or product_view_attributes_rest_attribute_group_docs which contain some attributes to show inside – the order of groups came from your order in admin - 

The class responsible for managing additional attribute group is Oro\Bundle\EntityConfigBundle\Layout\Block\Type\AttributeGroupRestType , is a block type :

  1.  
  2.     oro_entity_config.block_type.attribute_group_rest:
  3.         class: 'Oro\Bundle\EntityConfigBundle\Layout\Block\Type\AttributeGroupRestType'
  4.         arguments:
  5.             - '@oro_entity_config.attribute_render_registry'
  6.             - '@oro_locale.helper.localization'
  7.         tags:
  8.             - { name: layout.block_type, alias: attribute_group_rest }
  9.  

Which you can add to your container and passing as options current entity and attribute_family to show you all group of current product based on attribute family  

  1. </p>
  2.  
  3. <p>        - '@addTree':
  4.             items:
  5.                 product_view_attributes_rest:
  6.                     blockType: attribute_group_rest
  7.                     options:
  8.                         entity: '=data["product"]'
  9.                         attribute_family: '=context["attribute_family"]'
  10.                         attr:
  11.                             class: "product-view__attributes-container"
  12.                         vars:
  13.                             tabsOptions: '=data["attribute_groups_tabs_options_provider"].getTabsOptions(context["attribute_family"])'                   tree:
  14.                 product_view_additional_container:
  15.                     product_view_attributes_rest: ~
  16.  

So how you can move and structured your group is easy for example lets imagine that you want move your group product_view_attributes_rest_attribute_group_docs above product_view_attributes_rest_attribute_group_markets is easy go to your layout .yml inside you layout handler folder oro_product_frontend_product_view and write:

  1.  
  2.         - '@move':
  3.             id:  group product_view_attributes_rest_attribute_group_docs
  4.             siblingId: product_view_attributes_rest_attribute_group_markets 
  5.  

or remove group by:

  1.  
  2.         - '@remove':
  3.             id:  group product_view_attributes_rest_attribute_group_docs
  4.  

Let’s move just attributes from product_view_additional_container to product_view_primary_container especially to product_view_description_container go to admin open your attribute from products→ Product Attribues for example the name (code) Is benefits from Frontend options change select field visible to no now go to your layout and add :

  1.  
  2.         - '@add':
  3.             id: product_view_ benefits
  4.             parentId: product_view_description_container
  5.             blockType: block
  6.             prepend: false
  7.             options:
  8.                 vars:
  9.                     parentProduct: '=data["parentProduct"]'
  10.  

Go to twig related to this layout and add widget block:

  1.  
  2.  {% block _product_view_benefits_widget %}
  3.     <div {{ block('block_attributes') }}>
  4.         <div class="benefits">
  5.         <h2>{{ 'ibnab.frontend.benefits' | trans}}</h2>
  6.       {{ block.vars.parentProduct.benefits|raw }}
  7.       </div>
  8.     </div>
  9. {% endblock %}
  10.  

The article of today is done!

Comments

Related Posts

make your store more efficient

Solving problems. With open source technology. Professional results. That’s what makes Ibnab your best choice

IBNAB is a company made of a group of professionals whose work is providing secure open source solutions. Our company strives for reaching magnificent results with each experience and provides professional open source solutions that cover every part of the business process.